by ESP_Admin
Share
by ESP_Admin
Share
Create a Pricing Rule
A pricing rule establishes when an automated price change occurs. For example, you can create a rule that stays $0.10 below the Buy Box price, or another rule so your price stays $1.00 above the lowest marketplace price that uses the same fulfillment channel.
To create a pricing rule, complete the following steps:
- From the Automate Pricing home page, click Get Started. If you have already created a pricing rule and want to create a second rule, click Create a new pricing rule from the home page.

- In the drop-down, choose the type of rule you want to create. You can compare SKUs in your rule to the Buy Box price, the lowest price, or based on sales units
- Enter a rule name. This name should be short but descriptive enough to remember later. For example, ‘Match the Buy Box’ or ‘Holiday low price rule’. Click Continue to select marketplace(s).
- Select the checkbox for the marketplaces you want to create the rule. You can select more than one marketplace. Click Save and continue to select rule parameters.
- Define the price action you want Automate Pricing to take. If you have selected ‘Competitive Buy Box’ or ‘Competitive Lowest Price’ in step 2, you can choose to match, beat, or stay above the Buy Box price or Lowest price.
- Define the amount by which you want the automatic price action to trigger, either as an amount or a percent.
Note: You must enter a minimum value of at least 1% or $0.10, and the maximum percent you can enter is 90%. - Select filters for your rule by selecting the checkboxes next to each filter option. Filters allow you to identify the types of offers you want to compare. All Automate Pricing rules apply to offers on the same ASIN and condition. Additional examples of filters might include comparing to only FBA offers, or comparing to only offers from sellers with a seller rating within 5% of yours, or better.
- To confirm your rule functions as expected, read the Rule Summary for final confirmation. This will display below the filters, and state what your rule does.
- When you are finished with one marketplace, click Save this rule and your rule will be saved.
Note: If you would like to create this rule in more than one marketplace, expand the window for the next marketplace and repeat steps 5-9 until you have selected rule parameters for all the marketplaces that you want to create this rule. - When you are finished, click Continue to select SKUs to move to the next section of the Automate Pricing workflow. Until you assign SKUs to your rule, Automate Pricing will not change any prices on your SKUs.

Add SKUs to a pricing rule
Once you create a pricing rule, select SKUs to apply to the pricing rule. Automate Pricing does not change prices on your behalf until you click Start repricing for an SKU.
To add SKUs to a pricing rule, follow these steps:
- Select the SKU that you want to add to a pricing rule. Automate Pricing shows active SKUs in your catalog. You can search for SKUs by product name, ASIN, or SKU, or by-product identifier (UPC, EAN, or JAN).
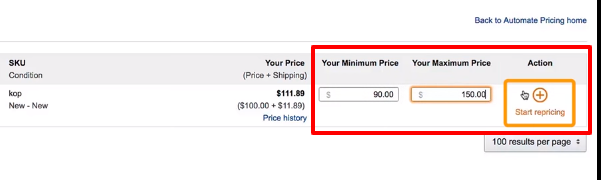
- After you find the SKU that you want to reprice according to your rule, add Your Minimum Price and Your maximum price.
Note: The minimum and maximum price are the limits of automated pricing changes, so ensure that you set prices at which you are comfortable selling. - Click the arrow next to the Take action button and select the rule to which you want to assign the SKU.
- Select Start repricing. When you click Start repricing for an SKU, the SKU will automatically reprice based on the rule you selected. The price follows the defined criteria, within the minimum and maximum prices that you set.
- Repeat with as many SKUs as you want to reprice in your catalog.
Do you see multiple prices on Keepa Graph while reviewing […]
Do you see multiple prices on Keepa Graph while reviewing […]
How do cashback websites work? Using cashback websites is the […]